It took me a while to figure out all the various steps (plus a couple of key tricks!) for creating a Mac OS .app bundle to make a distributable executable. I wanted to create a distributable executable for the kube-switchboard project so it is easier to use, but I didn’t want to rely on xcode or some other tool to create the bundle for me since it is a rust app. I also wanted it to have a nice icon so that it is easy to find in the app switcher. Below are the steps to get the app bundle built, followed by some tricks to know while tweaking and working with app bundles, and then something specific about running applications that need access to the bash runtime environment.
A (very) brief introduction to app bundles
MacOS app bundles are just directories with the .app end to their name. They also must have a directory called Contents inside of them along with an Info.plist file. In the instructions below I’ll be using the kube-switchboard application as my example application. I’ll call out the places where it’s important that names of things match so you can change the names accordingly. Feel free to check out the kube-switchboard github too if you want to see all the pieces in one place.
Creating the directory structure
To start create some directories and the Info.plist file:
- Create a new directory called
Kube Switchboard.app - Inside this directory create another directory called
Contents - Inside
Contentscreate two directories:MacOSandResources - Also inside
Contentscreate a file calledInfo.plist
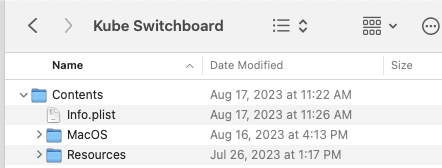
You should now have a directory that looks like this. Note that you can open any .app bundle by right clicking it and choosing Show Package Contents.
Creating an icon (optional)
If you want your application to have an icon, put your Icon.icns file in here.
You can create an icon file with this script: (you must start with a file named Icon1024.png, and it needs to be a 1024×1024 square)
mkdir MyIcon.iconset
sips -z 16 16 Icon1024.png --out MyIcon.iconset/icon_16x16.png
sips -z 32 32 Icon1024.png --out MyIcon.iconset/icon_16x16@2x.png
sips -z 32 32 Icon1024.png --out MyIcon.iconset/icon_32x32.png
sips -z 64 64 Icon1024.png --out MyIcon.iconset/icon_32x32@2x.png
sips -z 128 128 Icon1024.png --out MyIcon.iconset/icon_128x128.png
sips -z 256 256 Icon1024.png --out MyIcon.iconset/icon_128x128@2x.png
sips -z 256 256 Icon1024.png --out MyIcon.iconset/icon_256x256.png
sips -z 512 512 Icon1024.png --out MyIcon.iconset/icon_256x256@2x.png
sips -z 512 512 Icon1024.png --out MyIcon.iconset/icon_512x512.png
cp Icon1024.png MyIcon.iconset/icon_512x512@2x.png
iconutil -c icns MyIcon.iconset
rm -R MyIcon.iconset
(See this stack overflow answer where I got the script from for more details).
You should now have a file called MyIcon.icns. I renamed this file to Icon.icns for my app. Copy Icon.icns into the Contents directory inside your app bundle.
Create your Info.plist file
The Info.plist file defines settings for your application. This one is a pretty minimal example:
<?xml version="1.0" encoding="UTF-8"?>
<!DOCTYPE plist PUBLIC "-//Apple//DTD PLIST 1.0//EN" "http://www.apple.com/DTDs/PropertyList-1.0.dtd">
<plist version="1.0">
    <dict>
        <key>CFBundleDevelopmentRegion</key>
        <string>en</string>
        <key>CFBundleDisplayName</key>
        <string>Kube Switchboard</string>
        <key>CFBundleExecutable</key>
        <string>kube-swb-start</string>
        <key>CFBundleIconFile</key>
        <string>Icon.icns</string>
        <key>CFBundleIdentifier</key>
        <string>com.graphicsunplugged.kubeswitchboard</string>
        <key>CFBundleInfoDictionaryVersion</key>
        <string>6.0</string>
        <key>CFBundleName</key>
        <string>Kube Switchboard</string>
        <key>CFBundlePackageType</key>
        <string>APPL</string>
        <!--TODO make sure this matches the crate version-->
        <key>CFBundleShortVersionString</key>
        <string>0.1.1</string>
        <key>CFBundleSupportedPlatforms</key>
        <array>
            <string>MacOSX</string>
        </array>
        <!--TODO make sure this is incremented each time the crate version is incremented-->
        <key>CFBundleVersion</key>
        <string>1</string>
        <key>NSHighResolutionCapable</key>
        <true/>
        <key>NSMainNibFile</key>
        <string></string>
        <key>NSRequiresAquaSystemAppearance</key>
        <string>NO</string>
        <key>NSSupportsAutomaticGraphicsSwitching</key>
        <true />
    </dict>
</plist>
There are five things you must change in order for it to work:
CFBundleDisplayName– The display name for your application.CFBundleExecutable– The executable binary entry point for your application. (We’ll add this file shortly!)CFBundleIdentifier– The package identifier for your executable. You can make this whatever you want it to be, but it’s meant to be the unique identifier for your executable. Apple’s documentation.CFBundleName– The short name for your application. You can use this and excludeCFBundleDisplayNameif you want but I prefer to just set both.CFBundleVersion– The version of your application. You will want to update it each time you release new versions of your application.
Copy your executable into the bundle
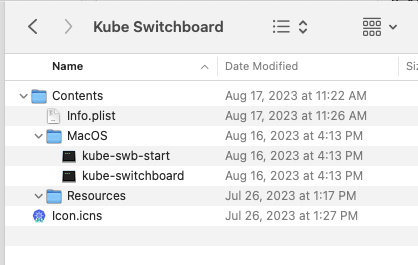
The most important part – Putting your executable into the bundle! The executable needs to be inside the MacOS folder inside the Contents directory. Its name must match the value in CFBundleExecutable. If it does not the bundle will not work! You should now have a directory like this:
(Note: My application starts with a bash script which then runs the actual application, which is why there are two executables). I’ll explain that below.
Wrapping up
That’s it! Now you should be able to double click your app bundle just like any other. You can copy it to your ~/Applications directory if you like, but it isn’t 100% necessary. You should also see your icon when you open the application switcher, spotlight, or in your task bar.
Below this are a couple of things I encountered that may be useful to you too:
Miscellany
If you need to adjust your Info.plist file after the fact it can be annoying. MacOS caches the file so you have to convince it to re-read the file in order for your changes to take effect. I’m not sure what the minimal amount of things to do is, but what worked for me is this process:
- Rename the
Info.plistfile to anything else (I just usedx)mv "Kube Switchboard.app/Info.plist" "Kube Switchboard.app/x" - Rename the app bundle to anything else.
mv "Kube Switchboard.app" x.app - Try to run the app. It should fail, saying that the bundle is invalid
- Move the files back to where they should be:
mv "Kube Switchboard.app/x" "Kube Switchboard.app/Info.plist"mv x.app "Kube Switchboard.app" - Now when you run the app your changes should take effect
Another weird thing
For my app to work properly I needed it to run within a bash environment. In order to make that happen I had to take some additional steps. The tl;dr is that I had to run my app through the Terminal.app application, but here are the detailed steps:
- Create a new bash script. I called mine
kube-swb-start. All it does is launch my application:
#!/usr/bin/env bash
SCRIPT_DIR=$( cd -- "$( dirname -- "${BASH_SOURCE[0]}" )" &> /dev/null && pwd )
open -a Terminal.app "$SCRIPT_DIR/kube-switchboard"
The first line gets the absolute path to where the script is being executed. The second opens the Terminal.app application and tells it to run the kube-switchboard binary which starts my application.
2. Change the Info.plist to point to the kube-swb-start script instead of the kube-switchboard binary.
3. Go through the cache-busting process for the Info.plist file defined above.
4. Now the application will start from within the terminal and runs as I needed it to.